
Some of our other friends were in on the plan, and wanted patterns, so I recorded everything I did and now I'm finally writing it up. Check it out after the jump!
Just as a note, you'll be seeing some Japanese show up here and there-not right away, but probably when I update this with charts. As Nyanko is a character from a Japanese series, and I am currently studying Japanese, I thought I'd make this pattern as bilingual as I'm able to. It's nothing different from what I've already said in English, so feel free to just skip over it. If you speak Japanese and notice I've said something wrong, please, please correct me! I will never learn otherwise :)
Please note that at this time this pattern has not been proofread but anyone other than me or pattern tested. Make at your own risk, and if you run across any problems, let me know. At this time the pattern is written instructions only, but charts will be coming soon.
That said, lets get started!
You'll need:
About 190 yards of worsted weight yarn in main color (I used Knitpicks Wool of the Andes in white)
About 40 yards of worsted weight yarn in orange contrast (I used Knitpicks Wool of the Andes in Pumpkin)
About 24 yards of worsted weight yarn in grey contrast (I used Knitpicks Wool of the Andes in Onyx Heather)
a small amount of worsted weight yarn in some shade of red
embroidery floss in red and black
a jingle bell
I used an F/3.75 mm hook for this project. All instructions use American crochet terminology. All pieces are worked in a spiral unless specified otherwise, so you'll want to mark the first stitch of each round with a stitch marker or safety pin or something.
SC: single crochet
SC2TOG: single crochet two together
CH: chain
FSC: foundation single crochet (I don't have a tutorial for this here, but there are plenty of great ones out there on the net!
BODY (make 1 using main color)
SC 6 in magic loop (6 sts)
SC2 in each stitch (12 sts)
*SC2 in first stitch, SC in next stitch* six times (18 sts)
*SC2 in first stitch, SC in next two stitches* six times (24 sts)
*SC2 in first stitch, SC in next three stitches* six times (30 sts)
*SC2 in first stitch, SC in next four stitches* six times (36 sts)
SC in each stitch (36 sts)
*SC2 in first stitch, SC in next five stitches* six times (42 sts)
*SC2 in first stitch, SC in next six stitches* six times (48 sts)
SC in each stitch (48 sts)
*SC2 in first stitch, SC in next seven stitches* six times (54 sts)
SC in each stitch (54 sts)
*SC2 in first stitch, SC in next eight stitches* six times (60 sts)
*SC2 in first stitch, SC in next nine stitches* six times (66 sts)
Work even for 16 rounds
*SC2TOG, SC in next nine stitches* six times (60 sts)
*SC2TOG, SC in next eight stitches* six times (54 sts)
SC in each stitch (54 sts)
*SC2TOG, SC in next seven stitches* six times (48 sts)
SC in each stitch (48 sts)
*SC2TOG, SC in next six stitches* six times (42 sts)
*SC2TOG, SC in next five stitches* six times (36 sts)
SC in each stitch (36 sts)
*SC2TOG, SC in next four stitches* six times (30 sts)
*SC2TOG, SC in next three stitches* six times (24 sts)
*SC2TOG, SC in next two stitches* six times (18 sts)
*SC2TOG, SC in next stitch* six times (12 sts)
SC2TOG six times (6 sts)
fasten off yarn and cut, leaving a long tail
HEAD (make 1 using main color)
SC six in magic loop (6 sts)
*SC2 in first stitch, SC in next two stitches* two times (8 sts)
SC2 in each stitch (16 sts)
*SC2 in first stitch, SC in next two stitches, SC2 in next stitch, SC in next four stitches* two times (20 sts)
SC in first five stitches, SC2 in next six stitches, SC in next 9 stitches (26 sts)
SC, *SC2 in next stitch, SC in next four stitches, SC2 in next stitch*, SC in next eight stitches, repeat from *, SC in next five stitches (30 sts)
SC in first 8 stitches, SC2 in next 10 stitches, SC in next 12 stitches (40 sts)
work even for four rounds
*SC2 in first stitch, SC in next nine stitches* four times (44 sts)
SC in each stitch (44 sts)
*SC2 in first stitch, SC in next ten stitches* four times (48 sts)
*SC in first six stitches, SC2 in next stitch, SC in next five stitches* four times (52 sts)
*SC in first six stitches, SC2 in next stitch, SC in next six stitches* four times (56 sts)
*SC2 in first stitch, SC in next ten stitches* five times, SC (61 sts)
*SC2 in first stitch, SC in next eleven stitches* five times, SC (66 sts)
work even for two rounds
*SC2TOG, SC in next nine stitches* six times (60 sts)
*SC2TOG, SC in next eight stitches* six times (54 sts)
*SC2TOG, SC in next seven stitches* six times (48 sts)
*SC2TOG, SC in next six stitches* six times (42 sts)
*SC2TOG, SC in next five stitches* six times (36 sts)
*SC2TOG, SC in next four stitches* six times (30 sts)
*SC2TOG, SC in next three stitches* six times (24 sts)
*SC2TOG, SC in next two stitches* six times (18 sts)
*SC2TOG, SC in next stitch* six times (12 sts)
SC2TOG six times (6 sts)
fasten off yarn and cut, leaving a long tail
EARS (make 2 using main color)
the ears are worked flat
CH2, turn
SC3 in first chain, CH1, turn (3 sts)
SC2 in first stitch, SC in next stitch, SC2 in last stitch, CH1, turn (5 sts)
SC2 in first stitch, SC in next three stitches, SC2 in last stitch, CH1, turn (7 sts)
SC2 in first stitch, SC in next five stitches, SC2 in last stitch, CH1, turn (9 sts)
SC2 in first stitch, SC in next seven stitches, SC2 in last stitch, Ch1, turn (11 sts)
SC2 in first stitch, SC in next nine stitches, SC2 in last stitch, CH1, turn (13 sts)
SC2 in first stitch, SC in next eleven stitches, SC2 in last stitch, CH1, turn (15 sts)
SC2 in first stitch, SC in next thirteen stitches, SC2 in last stitch, CH1, turn (17 sts)
Fold each ear in half so that the short sides line up, and join the sides together using single crochet as shown in the diagram below

fasten off yarn and cut, leaving a long tail
FEET (make 4 using main color)
SC six in magic loop (6 sts)
SC in each stitch (6 sts)
SC2 in each stitch (12 sts)
work even for two rounds
*SC2 in first stitch, SC in next stitch* six times (18 sts)
work even for three rounds
fasten off yarn and cut, leaving a long tail
TAIL (make 1 using main color)
SC six in magic loop (6 sts)
SC2 in each stitch (12 sts)
SC in each stitch (12 sts)
*SC2 in first stitch, SC in next stitch* six times (18 sts)
*SC2 in first stitch, SC in next two stitches* six times (24 sts)
work even for three rounds
*SC2TOG, SC in next two stitches* six times (18 sts)
*SC2TOG, SC in next stitch* six times (12 sts)
SC in each stitch (12 sts)
SC2TOG six times (6 sts)
fasten off yarn and cut, leaving a long tail
HEAD SPOTS (make one each in orange and gray)
these are worked flat
CH6, turn
starting in second chain from hook, SC in each chain, CH1, turn (5 sts)
skip first stitch, SC in each stitch after, CH1, turn (4 sts)
SC in each stitch, CH1, turn (4 sts)
skip first stitch, SC in each stitch after, CH1, turn (3 sts)
SC in each stitch, CH1, turn (3 sts)
SC in each stitch, CH1, turn (3 sts)
SC in each stitch, CH1, turn (3 sts)
SC2 in first stitch, SC in next two stitches, CH1, turn (4 sts)
SC in first three stitches, SC2 in last stitch, CH1, turn (5 sts)
SC2 in first stitch, SC in next four stitches, CH1, turn (6 sts)
SC in each stitch, CH1, turn (6 sts)
SC in each stitch, CH1, turn (6 sts)
SC in each stitch, CH1, turn (6 sts)
SC in each stitch, CH1, turn (6 sts)
SC in each stitch, CH1, turn (6 sts)
skip first stitch, SC in each stitch after, CH1, turn (5 sts)
SC in each stitch, CH1, turn (5 sts)
SC in each stitch, CH1, turn (5 sts)
SC in first three stitches, SC2TOG, CH1, turn (4 sts)
skip first stitch, SC in each stitch after, CH1, turn (3 sts)
fasten off yarn and cut, leaving a long tail
ORANGE BACK SPOT (make 1 in orange)
this piece is worked flat
CH12, turn
starting in second chain from hook, SC in each chain, CH1, turn (11 sts)
SC2 in first stitch, SC in next 10 stitches, CH1, turn (12 sts)
SC in first 11 stitches, SC2 in last stitch, CH1, turn (13 sts)
SC in first 12 stitches, SC2 in last stitch, CH1, turn (14 sts)
SC in each stitch, CH1, turn (14 sts)
SC2 in first stitch, SC in next 13 stitches, CH1, turn (15 sts)
SC in each stitch, CH1, turn (15 sts)
SC in each stitch, CH1, turn (15 sts)
SC in first 14 stitches, SC2 in last stitch, CH1, turn (16 sts)
SC in first 15 stitches, SC2 in last stitch, CH1, turn (17 sts)
SC in each stitch, CH1, turn (17 sts)
SC in first 16 stitches, SC2 in last stitch, CH1, turn (18 sts)
SC in first 17 stitches, SC2 in last stitch, CH1, turn (19 sts)
SC in each stitch, CH1, turn (19 sts)
SC in each stitch, CH1, turn (19 sts)
SC2 in first stitch, SC in next 17 stitches, SC2 in last stitch, CH1, turn (21 sts)
SC in each stitch, CH1, turn (21 sts)
SC in each stitch, CH1, turn (21 sts)
SC in each stitch, CH1, turn (21 sts)
SC in each stitch, CH1, turn (21 sts)
SC in first 10 stitches, SC2TOG, SC in last nine stitches, CH1, turn (20 sts)
SC in each stitch, CH1, turn (20 sts)
SC in each stitch, CH1, turn (20 sts)
SC in each stitch, CH1, turn (20 sts)
SC in first nine stitches, SC2TOG, SC in last nine stitches, CH1, turn (19 sts)
SC in each stitch, CH1, turn (19 sts)
SC in each stitch, CH1, turn (19 sts)
SC in first nine stitches, SC2TOG, SC in last eight stitches, CH1, turn (18 sts)
SC in each stitch, CH1, turn (18 sts)
SC in first eight stitches, SC2TOG, SC in last eight stitches, CH1, turn (17 sts)
SC in first eight stitches, SC2TOG, SC in last seven stitches, CH1, turn (16 sts)
SC in each stitch, CH1, turn (16 sts)
SC in first seven stitches, SC2TOG, SC in last seven stitches, CH1, turn (15 sts)
SC in first seven stitches, SC2TOG, SC in last six stitches, CH1, turn (14 sts)
SC in first three stitches, SC2 TOG, SC in next four stitches, SC2TOG, SC in last three stitches, CH1, turn (12 sts)
*SC2TOG, SC in next two stitches* two times, SC2TOG, SC in next stitch, skip last stitch, CH1, turn (8 sts)
SC2TOG, SC in next four stitches, SC2TOG, CH1, turn (6 sts)
SC in first two stitches, SC2TOG, SC in next stitch, skip last stitch, CH1, turn (4 sts)
SC in first stitch, SC2TOG, SC in last stitch (3 sts)
SC2TOG, skip last stitch (1 stc)
fasten off yarn and cut, leaving a long tail
GRAY BACK SPOT (make 1 in gray)
this piece is worked flat
CH10, turn
starting in second chain from hook, SC in each chain, CH1, turn (9 sts)
SC in each stitch, CH1, turn (9 sts)
SC2TOG, SC in next six stitches, SC2 in last stitch, CH1, turn (9 sts)
SC in each stitch, CH1, turn (9 sts)
SC in each stitch, CH1, turn (9 sts)
SC in each stitch, CH1, turn (9 sts)
SC in first eight stitches, SC2 in last stitch, CH1, turn (10 sts)
SC in each stitch, CH1, turn (10 sts)
SC in first nine stitches, SC2 in last stitch, CH1, turn (11 sts)
SC in each stitch, CH1, turn (11 sts)
SC in each stitch, CH1, turn (11 sts)
SC in each stitch, CH1, turn (11 sts)
SC in each stitch, CH1, turn (11 sts)
SC in each stitch, CH1, turn (11 sts)
SC in each stitch, CH1, turn (11 sts)
SC in each stitch, CH1, turn (11 sts)
SC in each stitch, CH1, turn (11 sts)
SC in each stitch, CH1, turn (11 sts)
SC in each stitch, CH1, turn (11 sts)
skip first stitch, SC in each stitch after, CH1, turn (10 sts)
SC in each stitch, CH1, turn (10 sts)
SC in each stitch, CH1, turn (10 sts)
SC in each stitch, CH1, turn (10 sts)
SC in each stitch, CH1, turn (10 sts)
SC in each stitch, CH1, turn (10 sts)
SC in each stitch, CH1, turn (10 sts)
SC in first four stitches, SC2TOG, SC in last four stitches, CH1, turn (9 sts)
SC in each stitch, CH1, turn (9 sts)
SC in each stitch, CH1, turn (9 sts)
SC in each stitch, CH1, turn (9 sts)
SC in each stitch, CH1, turn (9 sts)
SC in each stitch, CH1, turn (9 sts)
SC in first four stitches, SC2TOG, SC in last three stitches, CH1, turn (8 sts)
SC in each stitch, CH1, turn (8 sts)
SC in each stitch, CH1, turn (8 sts)
SC in first three stitches, SC2TOG, SC in last 3 stitches, CH1, turn (7 sts)
skip first stitch, SC2TOG, SC in last four stitches CH1, turn (5 sts)
SC2TOG, SC in next stitch, skip last two stitches, CH1, turn (2 sts)
SC2TOG, CH1, turn (1 stc)
fasten off yarn and cut, leaving a long tail
COLLAR (make 1 in red)
there are two ways you can do this
CH55, turn
starting in second chain from hook, SC in each chain (54 sts)
fasten off yarn and cut
OR
FSC 54
fasten off yarn and cut
ASSEMBLY
Stuff the body, head, feet, and tail with the stuffing material of your choice. Make sure to stuff them fairly firmly, or the shape won't be quite right. You may have to squish things around a bit to get the right shape. Close off the openings in the head, body, and tail, but leave the ends of the feet open
Using the long tails you left (or another piece of white yarn) stitch together the head, body, ears, feet, and tail. Here are some pictures to give you an idea of the right placement. The assembly may be a bit tricky because of the way the patches fit together with all of the other parts, so you may want to pin everything together and make sure everything is fitting together right before you actually stitch everything on.


The ears are a bit tricky-what you need to do is fold under a small bit of the folded edge to the inside, and then hold the ear in a curve so it holds the right shape when you stitch it on. Here are some pictures of what I mean, and a diagram of the part you need to fold.


The ears need to be placed so that the narrow part of the patches fits exactly between them-the inner edges need to be about an inch and a quarter apart
Next, stitch the two head patches together along the longer straight edge, and stitch them onto the head with the straight "tail" edge lining up with the seam between the head and the body. Then, stitch the two larger patches together as shown in the diagram and stitch them onto the body, with the rounded opening fitting around the tail and the straight edge lining up with the seam between the head and the body.
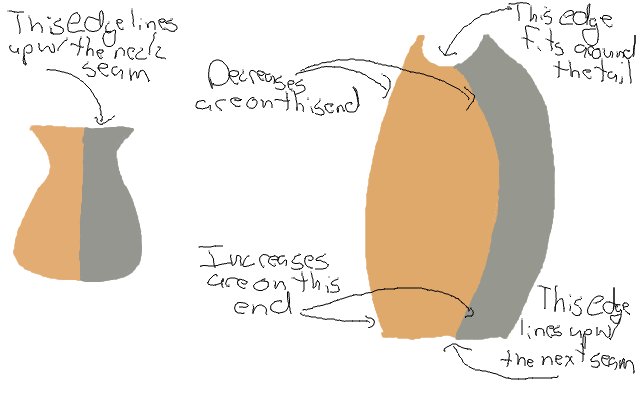
You might need to stretch and tug on the sides of the patches to get a nice even line, but it should go into place with a minimum of fiddling. You can see how the gray should fall in one of the pictures above, and here's one of the orange.

Put the collar around the neck and string the bell on the yarn tail, then stitch it closed.
Finally, using the embroidery floss, embroider on the face as you can see in the below picture, and you have your own Nyanko-sensei!

This project was an expression of my love for my friend, but also of my love for the series. I made it as a fan, and I'm sharing it for other fans. Distributing patterns of copyrighted characters is always a bit of a tricky subject, and I would hate to have to remove this, so please, please don't sell anything you make with this pattern! Thanks, guys : )
The ravelry page for this project is here
I am in awe of this project and deeply flattered! This is so neat. Wow. Thank you!
ReplyDeleteOh my goodness! Thank you so much for posting this. I can't wait to get started on this. ^-^
ReplyDeleteThis is AWESOME. :)
ReplyDeleteI made it and it was awesome and cute, thank you very much :)
ReplyDeletethis will be the best Christmas present! thank you very much! I hope that I can make the correct translation of how to knit, my English is monstrous
ReplyDelete